

Hi all, this article is part of the docker & kubernetes series, in which I am sharing my understanding around them by learning via a course. Today's topic is how do we build custom docker images.
Why do we need custom docker images.
There are many cases where we need to use our docker images
- Publish a bundled software with all the dependencies, remember this is the main reason why docker was needed.
- Let's say you are the developer of redis and want to share it with everyone ( other than .exe or other packaged bundle ) as a platform-independent version.
- Frontend team of your organization do not want to install all backend dependencies ( one-by-one ) and just want to start a local server.
- and many which I might not be aware of at this moment 🤞🏻.
Steps to build a docker image
- We will need something called a dockerfile ( a new word again ), which is containing configuration and commands to build and run a docker image.
- Set a base image, to build a custom image we will first need to set a base image on top of which this new image will be created.
- Add additional dependencies which are required to run the program.
- Add an entrypoint / startup command, which will run during docker run.
- Build the image.
- Publish the image to the registry.
- Use it!!
Now, we will go step by step.
Dockerfile
Setting a base image, adding dependencies & specifying startup commands will be done via Dockerfile.
Dockerfile is just a text file named Dockerfile without any instruction.
To create a Dockerfile, you will need to go to the project directory for which you want to build the image. ( sub-directory or outer directory may work, who knows, but keeping the complexity aside for now )
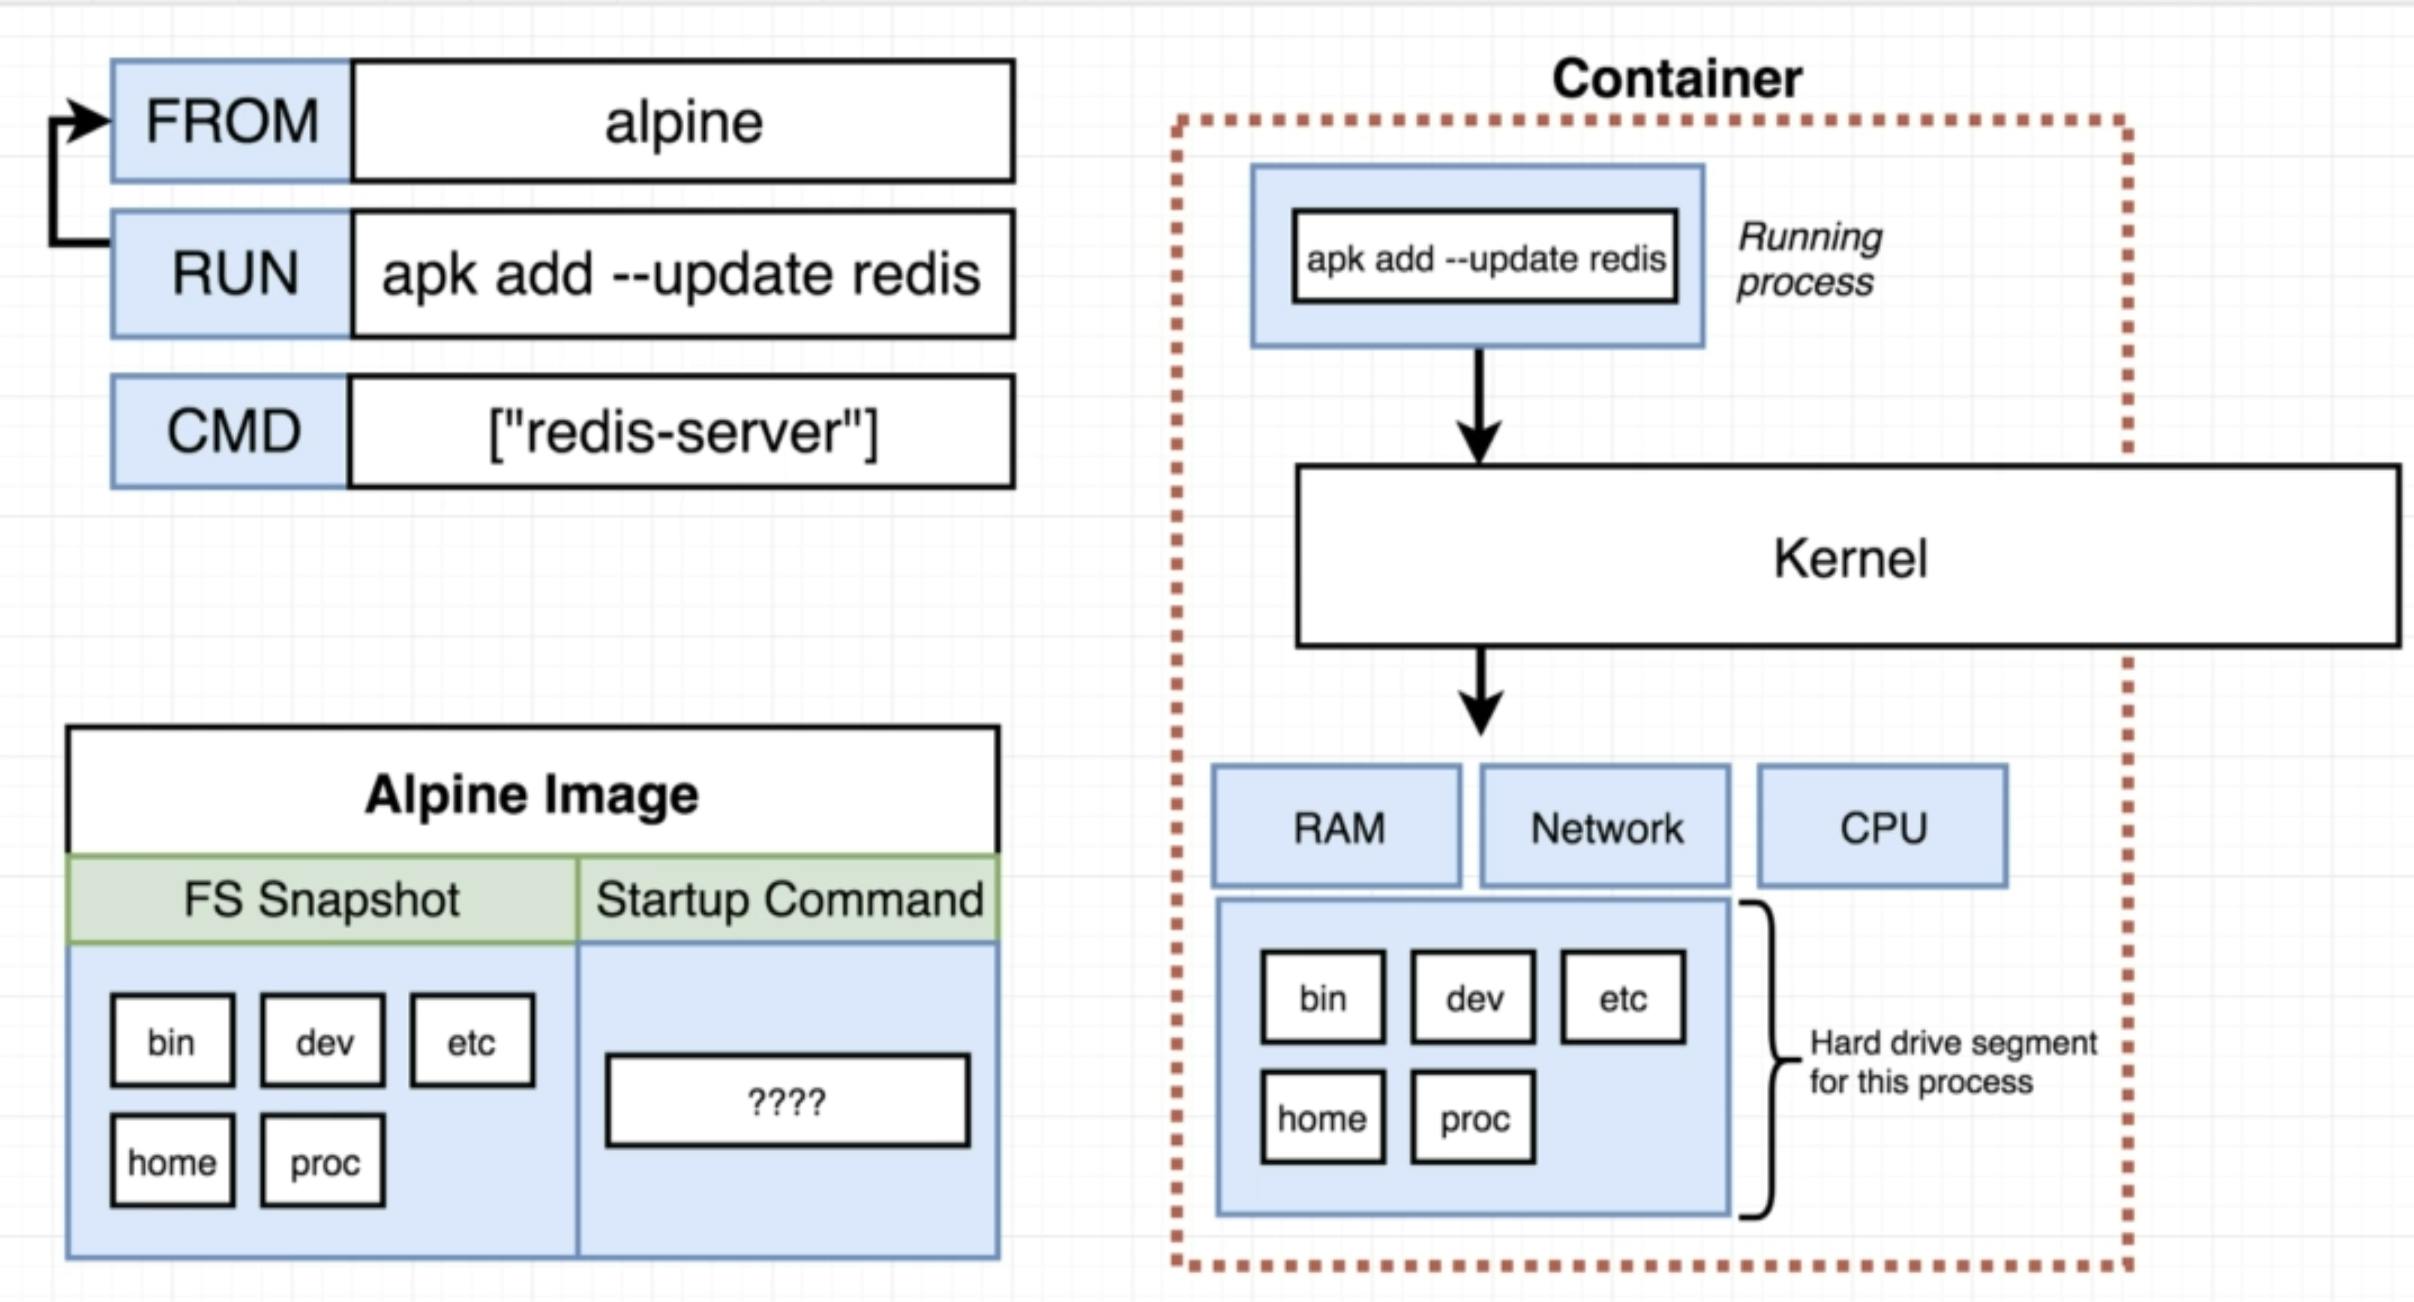
This is an example of a simple dockerfile
FROM alpine
RUN apk add --update redis
CMD ["redis-server"]
Yes, a dockerfile can be this short 🤘🏻.
FROM alpinespecifies a base image to use.- Here
FROMis a command, which informs docker server that usealpineimage for building this docker image as a base image ( alpine is lightweight Linux distribution ).
- Here
RUN apk add --update redisspecifies dependencies.- Here
RUNcommand asks docker server to installredisfromapk( apk is the tool used to install, upgrade, or delete software on a running system ).
- Here
CMD ["redis-server"]specifies startup command.- Here
CMDtells docker server to start executeredis-servercommand when this image runs in a container.
- Here
Remember, a docker image runs in a docker container and a docker container is a pure virtual linux kernel on your disk, so as a first step to run any software you will need an operating system. This is what we have done by doing FROM alpine we have installed an OS in a fresh mount.
Then, in the next step, we installed redis. Redis installation is not done by pulling a docker image, it is just normal redis installation from package distribution.
There are many other things in dockerfile, will see them later, right now let's focus on how to build the image.
Docker build
Now, as our Dockerfile is ready we need to run docker build . to build the image from that file.
On doing docker build docker-cli will, send the build context to docker daemon ( docker-server running in your machine ). Build context here is . the current working directory.
While building docker-server creates a temporary container for each step except the first one from the image generated in the previous step.
I know, the above statement just bounced off your head 😭, so let me put it this way.
On running the first step, which is FROM alpine docker server fethches the alpine image from the registry ( so far so good ).
In the next step, which is RUN apk add --update redis, docker server looks back to the previous command, takes the image from that command, and creates a temporary container from that image ( i.e. puts the alpine file-system snapshot in the container disk space ) & executes the given command, which in our case is install redis, so now the temporary container contains redis installed in its file-system. Docker server now terminates the temporary container and puts the file-system snapshot in an image.
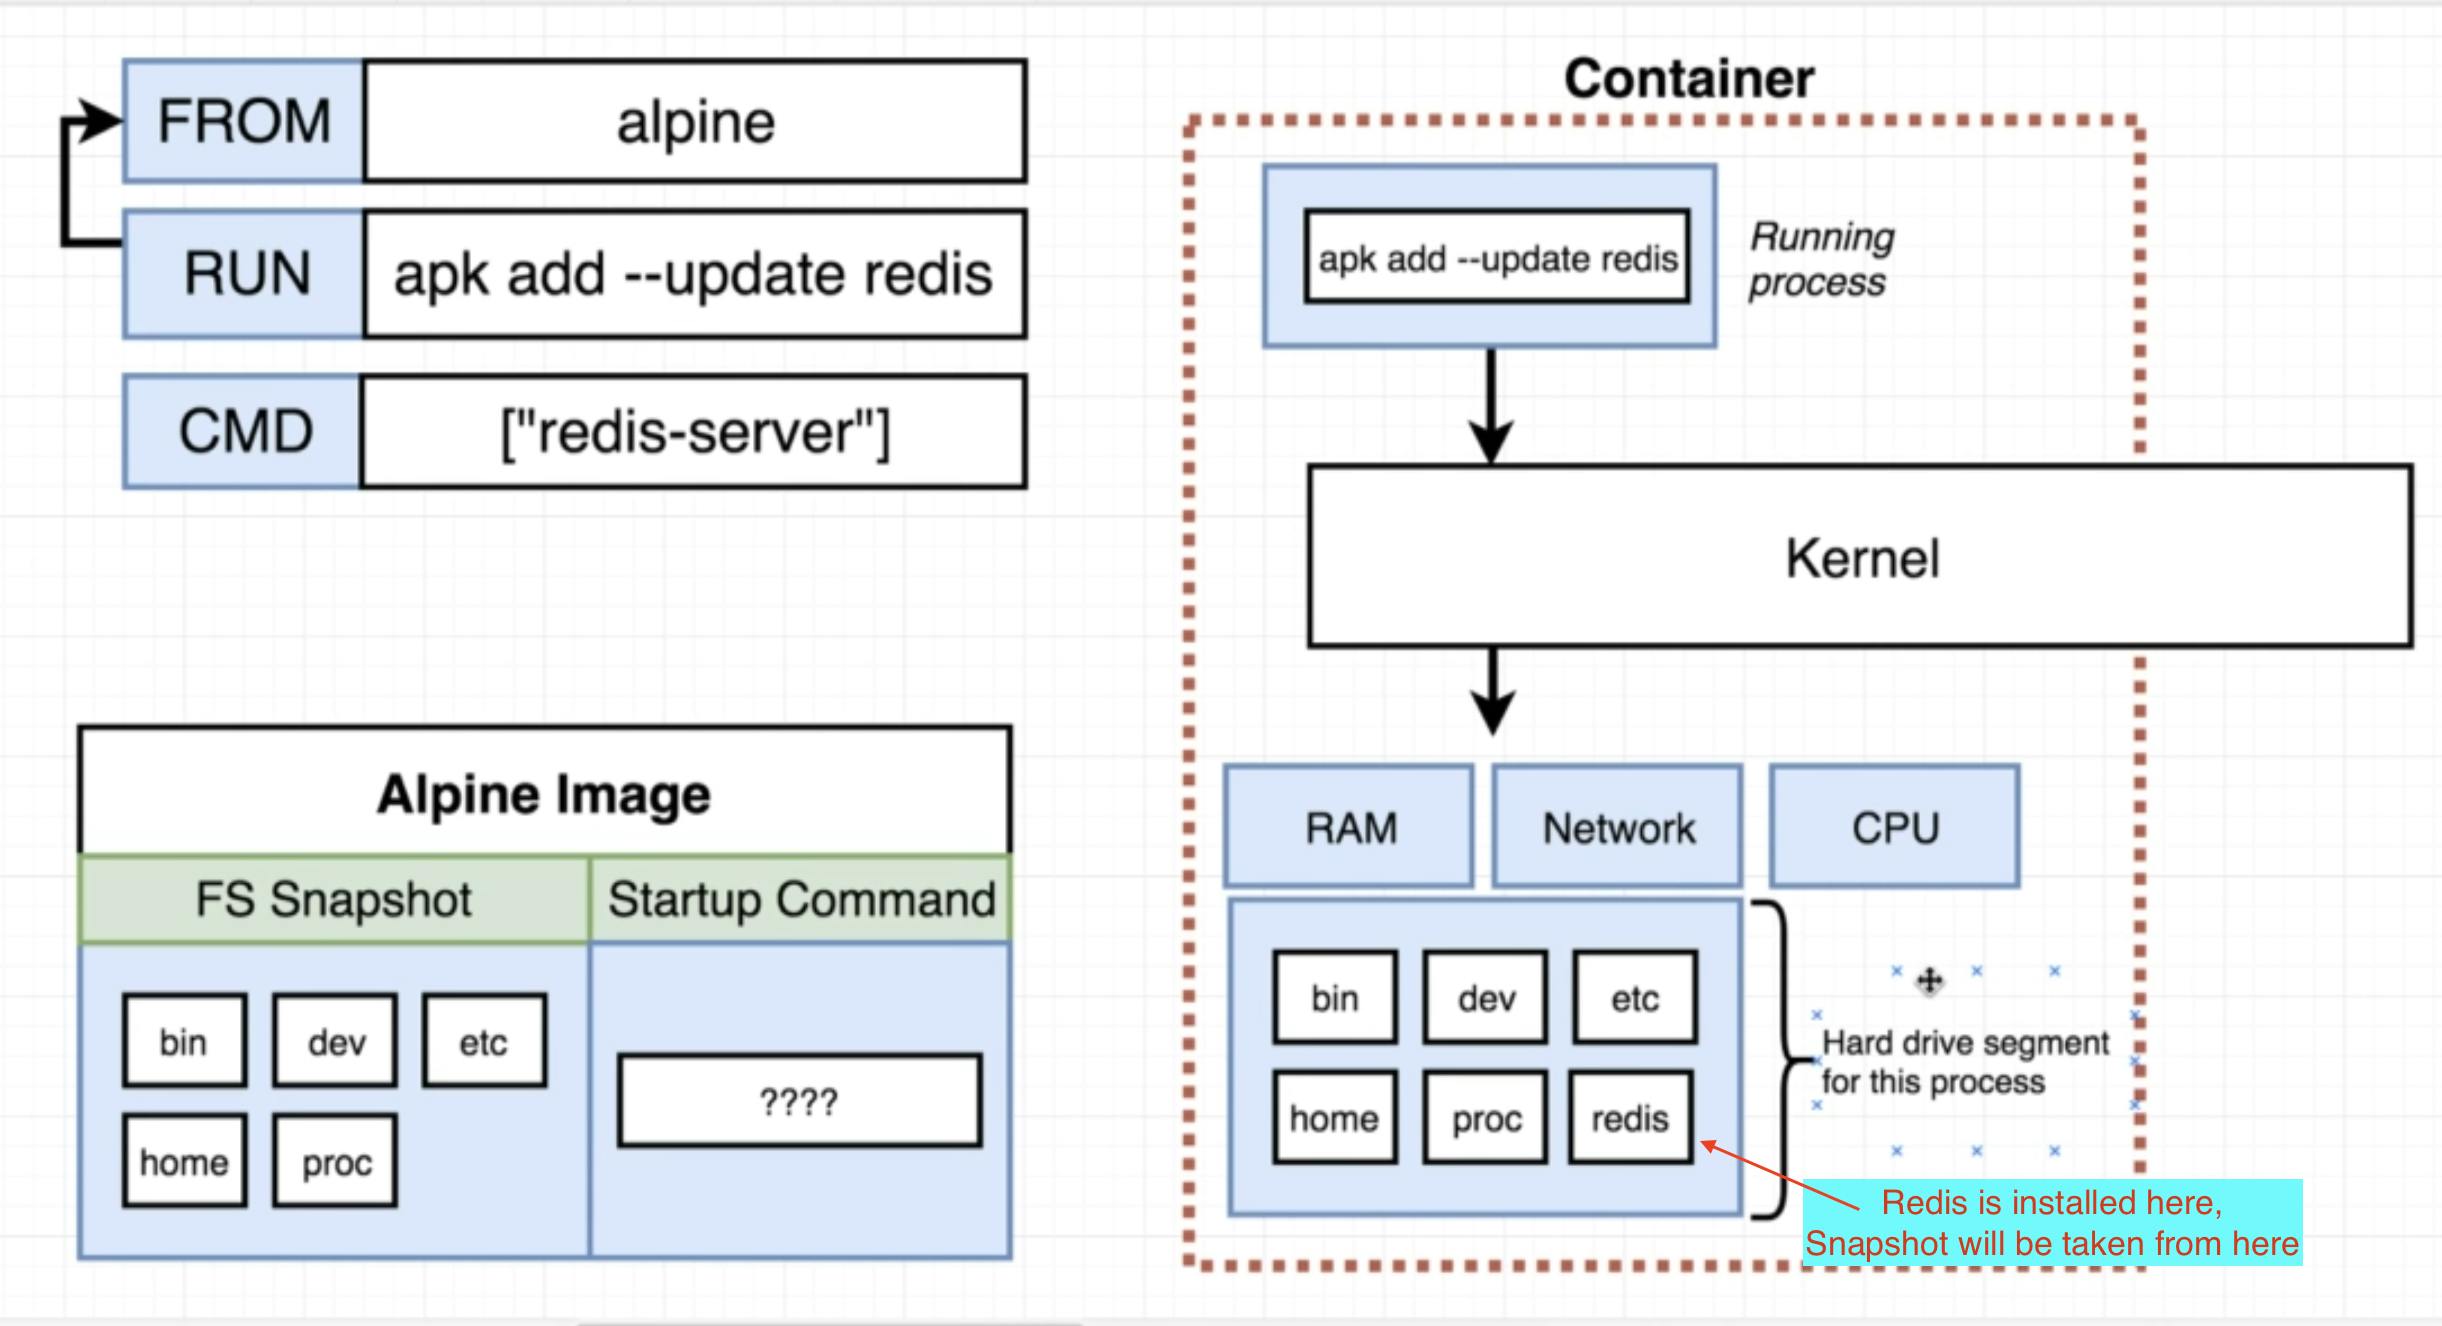
In the next step, which is CMD ["redis-server"], docker server again looks back to the previous command and takes the image from there, now the image contains redis installed in it. Docker server again starts a new temporary container, gives it instruction to set the startup command as redis-server and terminates the container, the newly built image now has redis installed in it with startup command as redis-server.
docker-cli prints the ID of image on the console, which you can use in docker run or docker start.
Now, Let's say we change the Dockerfile a bit and add one more instruction
FROM alpine
RUN apk add --update redis
RUN apk add --update gcc
CMD ["redis-server"]
and run docker build . again, this time in step 1 there will not be fetching of alpine image done as it is already there in the cache, in step 2 there will not be temporary container creation as there is no change in between step 1 & 2 so it uses the previously generated image of step 2. From step 3 onwards there is a change in dockerfile, so normal flow of creating temporary container will continue. This is why the images gets built very fast in the subsequent builds.
Tag
In the above step, we built an image but docker returned a weird hash type ID, which is very hard to remember. So, here we will tag the image while building it by running
docker build -t dhruvsaraiya/docker-redis:latest .
The convention for tagging a personal image is,
dhruvsaraiya -> your docker user name
docker-redis -> project on which this image is build
latest -> version, it can be like 0.0.1 too.
on running this, docker-server will still generate image with weird hash as ID, but it will also tag the image with the given name and version, and you can then do docker run dhruvsaraiya/docker-redis:0.0.1 or dhruvsaraiya/docker-redis ( by default it will take latest generated image ).
Publish
Publishing or pushing to docker-hub requires a docker account, you can create it and then push it by,
$ docker login
$ docker push <ID>
honestly, I have not explored this much so won't be able to share.
This is just the basics of how building an image works, there is a lot more complexity in building images and specifically, Dockerfile, will touch that on some lazy raining day.
Hope you liked it, correct me wherever possible.